CellPAINT 2.0 — Documentation
Frequently-Asked Questions
Possible issues opening cellPAINT 2.0 on Mac.
Problem 1: “Cannot open app from unidentified developer.”
This problem originates from our app not being signed through the mac gatekeeper yet. Rest assured our app is safe.
Solution:
Step 1: Navigate to or search for the “Terminal” and open it
Step 2: In the prompt enter: chmod +x (drag cellPAINT here)/Contents/MacOS/*
Step 3: Delete “(drag cellPAINT here)”
Step 4: Drag the cellPAINT app into the terminal where “cellPAINT here” was
Step 5: Hit enter and run the program normally.
Problem 2: “You do not have permission to open the application.”
This problem seems to be exclusive to users using the new Big Sur OS.
Solution:
Step 1: Navigate to or search for the “Terminal” and open it.
Step 2: Enter this command into the prompt: sudo chmod -R 755
Step 3: Drag the cellPAINT app into the terminal after the 775
Step 4: A path should appear after the “775”
Step 5: Verify there is a space between “775” and the path.
Step 6: Hit enter and run the program normally.
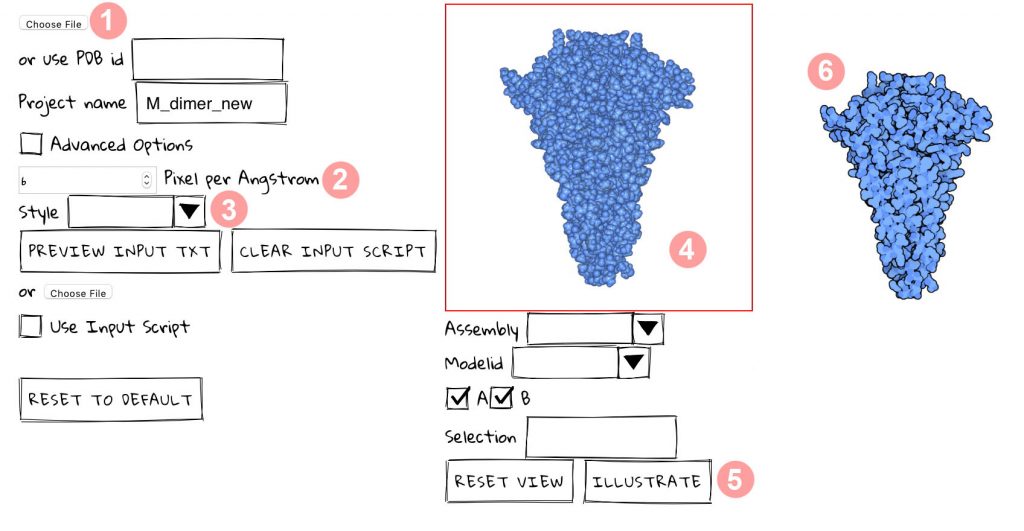
Many people are asking to import non-PDB coordinate files. This is not currently implemented but is on our to-do list. For now, you can generate images with any software and import them using the “Browse Image” in “Create Ingredient.” To be consistent with the other molecules in CellPAINT, be sure to create these at a scale of 6 pixels/A.
Here’s how to do it with our program Illustrate.
Go to the web version of illustrate and (1) choose your coordinate file, (2) set the scale to 6 pixels/A (important!!!), (3) (optional) choose a style, (4) pick a view using the NGL window, (5) click “ILLUSTRATE”, and (6) save the image (drag to a folder or right click and save).
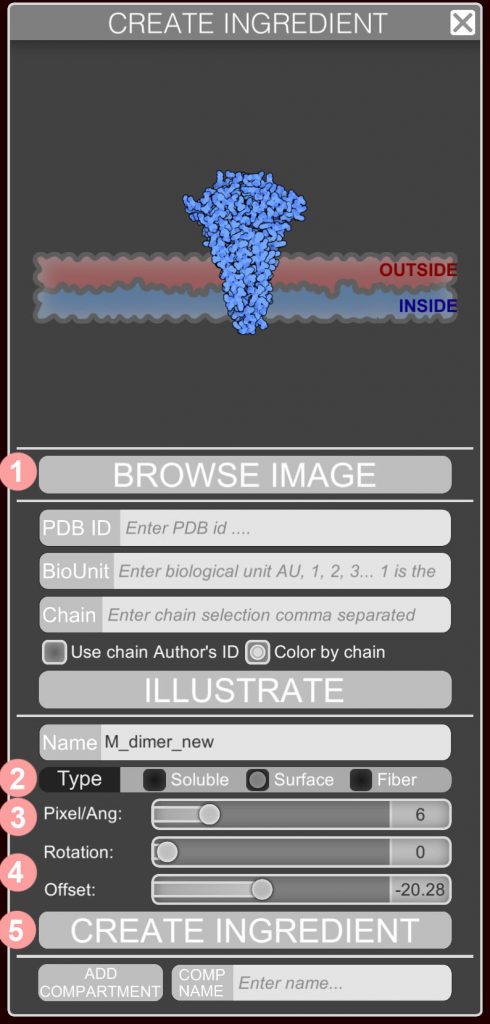
Then go to CellPAINT and click the little “+” icon at the top. This opens the “CREATE INGREDIENT” window. (1) Choose “BROWSE IMAGE” to find the picture, (2) pick what type of molecule it is, (3) set the scale to 6 pixels/A (important!!!), (4) change the rotation and offset if needed, and (5) click “CREATE INGREDIENT.” It should show up in your current palette, and you can start drawing!
If you are still having problems, please visit “Tickets” at the CellPAINT SoureForge page to report a problem.
Software by Adam Gardner and Ludovic Autin, scientific support by Martina Maritan and Arthur J. Olson, supported by US National Institutes of Health R01-GM120604, David S. Goodsell principal investigator.
If you use this software, please cite:
Gardner, A., Autin, L., Barbaro, B., Olson, A. J. & Goodsell, D. S. (2018) CellPAINT: Interactive illustration of dynamic mesoscale cellular environments. IEEE Comp. Graph. Appl. 38(6), 51-66. doi: 10.1109/mcg.2018.2877076. Available on PubMedCentral PMC6456043.

Top Menu
RESTORE allows you to upload several premade scene files, or restore your own save files.
- scene files are saved as txt, json or zip files, depending on what is included in the scene.
- the “append recipe ingredient” checkbox will append the new recipes (json) and/or the scene (txt) to the current session.
- options are provided at the bottom to include multiple directories that contain ingredient files
SAVE will create a scene file with the current scene in .txt format or .zip format.
SNAPSHOT will capture an image of the current scene as a .png file.
TRASH will clear the current scene to produce a blank canvas.
HELP will show a visual summary of all commands in the CellPAINT interface.
Ingredient Palettes
ARROWS move to different MOLECULE PALETTES.
MAGNIFYING GLASS toggles the INGREDIENT INFO panel.
- will display information for the currently-selected ingredient.
- use the sliders to change the color of the ingredient.
PLUS SIGN toggles the CREATE INGREDIENT panel.
VIEW icons at either side toggle between a text view and an icon view of ingredients.
SEARCH BOX will filter ingredients by name.

INGREDIENT PALETTE displays the molecules that you can choose to draw. Access it using the magnifying glass icon in the menu.
- for membrane proteins, draw a membrane first, then drawing with the protein icon will be allowed.
- right click to delete custom ingredients or groups.
- the number of molecules drawn in the scene will be displayed in the palette.

Create Ingredient Panel
This panel allows you to create new ingredients. Access the panel using the plus sign icon in the menu.
BROWSE IMAGE will input an image in .png or .jpg format. The scale of the image is controlled with the scale slider (see below).
Files from the PDB may be used to create ingredients in several steps:
- enter PDB ID;
- (optional) define the biological unit;
- (optional) define the chain;
- (optional) use author-defined chain ID;
- (optional) color by chain;
- click ILLUSTRATE to create an image, which will be displayed in the upper window. If a sad smiley appears, click again, the server may be unresponsive;
- specify a name for the ingredient;
- define if the ingredient is soluble, membrane-bound, or a fiber;
- use the sliders to define the relevant scale, rotations, and translations for the type of ingredient; the default scale is 6 pixels/Angstrom;
- click CREATE INGREDIENT to place the new ingredient in the current palette;
- a new palette may also be created with the text box at the bottom of the panel.

Settings
GEAR will toggle a menu to control the physics that are used for the simulation.
- TOGGLE PHYSICS will turn off all physics, so molecules will be able overlap.
- PROTEIN COLLISIONS will turn off steric contacts between ingredients on one of the three levels of the 2.5D display.
- FIBER-PROTEIN COLLISION controls contacts between fibers and soluble molecules.
- FIBER-FIBER COLLISION controls contacts between neighboring fibers.
- MEMBRANE-MEMBRANE COLLISION controls contacts between neighboring.
BACKGROUND COLOR controls the color of the background with HSV sliders or values.
BACKGROUND IMAGES — click the gear to open the LOAD IMAGE panel for reading background images.
Load Image Panel
- LOAD IMAGE will fetch the file from your computer — (.png,.jpeg,.tiff,.bmp).
- ICON at top right will show the currently selected background image in interactive mode ( see below ).
- TOGGLE IMAGE VISIBILITY will show or hide the image in the canvas.
- PIXEL/ANGSTROM defines the scale of the image when displayed in the canvas.
- IMAGE OPACITY will define the transparency of the image in the canvas.
- ROTATION will rotate the image in the canvas.
- LAYER controls the stacking of background images, if several are loaded into the canvas. Select a background image and use the slider to define its layer number–larger numbers are in front of smaller numbers.
- IMAGE ON TOP will place the image in the foreground, in front of painted ingredients.
- INTERACTIVE MODE, when selected, will let you select and drag the images to a desired position. If this box is not selected, selection dragging will act on the ingredients.
- SHOW CELLPAINT SCALE BAR shows and hides the scale bar.


Painting Tools
X will close the entire program.
PAINTBRUSH adds molecules to the scene. The settings menu will show:
- NUMBER OF MOLECULES PER CLICK will place one or multiple molecules with each click
- RADIUS OF MOLECULES PER CLICK will place molecules in an area around the mouse position

GROUP allows you to group multiple ingredients, and create a new ingredient with the group.
- select several molecules in the scene and hit “enter” to create a group.
- the new ingredient will be created in the currently-selected molecule palette.
- an option in the settings menu allows you to name the group.

LOCK allows you freeze molecules in place.
- select several molecules in the scene and hit “enter” to lock them in place.
NUDGE allows you to move molecules in the canvas.
- click and drag molecules to move them.
- click will apply a force on the molecule, ctrl-click will move the molecule directly, shft-click will move all instances of a particular molecule.
- a settings slider allows you change the force that is applied during the drag operation.

PIN will freeze one molecule in place.
- click on a molecule to freeze it in place.
PIN-TO will connect two molecules together.
- click on two molecules to connect them together.
- DISTANCE TO APPLY slider controls the distance between the interacting molecules.
- STRENGTH slider controls the strength of the constraint between the molecules.
- COLLISION checkbox will turn on and off the physics of collision between the molecules.

MEASURE allows you to measure distances between molecules in the scene.
- click and drag between any two points in the scene to measure distances.
- click enter to save the measurement.
- Setting options allow you to save and display multiple measurements.

ERASE allows you to remove molecules you don’t want.
- Click on a molecule to erase it.
- Shft-click to remove all copies of a particular type of molecule.
TEMPERATURE allows you to change the temperature (and motion) of the scene.
- Click and drag on the icon to change the temperature.